Delete pre-installed Windows software (bloatware).
Table of contents
| What bloatware is |
| Why uninstalling bloatware is a challenge |
| Which bloatware can be removed safely |
| How to remove pre-installed software |
| Conclusion and personal view |
In the world of technology, bloatware – unwanted software that manufacturers pre-install on new devices – is a pervasive nuisance for many users.
Although these programs are often introduced with the intention of providing users with additional functionality, they often end up as unused resource hogs, taking up disk space and affecting system performance. Removing these unwanted applications is particularly difficult on Windows.
Here we will show you how you can decide for yourself which software you want to use and remove Windows bloatware as you wish for Windows 10 and 11.
Why uninstalling bloatware is a challenge
Some of the preinstalled applications are more deeply integrated into the operating system than normal apps. This means that they are not just simple programs that you can uninstall, but are partly part of the larger Windows ecosystem.
It is important to note that removal can potentially affect the stability of the system, especially if bloatware is not removed right at the beginning.
Therefore, we recommend performing bloatware removal during the first system setup.
Which bloatware can be removed safely
OEM software (Original Equipment Manufacturers) are applications that are often pre-installed by manufacturers in addition to the applications pre-installed by Microsoft.
These programs often serve as an additional source of income for the manufacturer or are intended to increase brand value through exclusive offers.
Removal of this software may be complicated by contractual agreements between Microsoft and the OEMs, further restricting users.
While advanced users can find success with specialized tools and methods, the majority of users remain burdened with unwanted software that slows down their devices and takes up valuable storage space.
How to remove pre-installed software
Removing can be a challenge, which is why you can simply follow the upcoming step by step guide to uninstall unwanted pre-installations.
Preparation
If you have been using your system for a while, make sure you have backed up your system before making any changes. This protects you from potential data loss.
For more information about Windows Backup: Set up Windows Backup
Start PowerShell
Open PowerShell as administrator. This is necessary to run the script.

Download script
Download the "Win11Debloat" script from GitHub. Load script
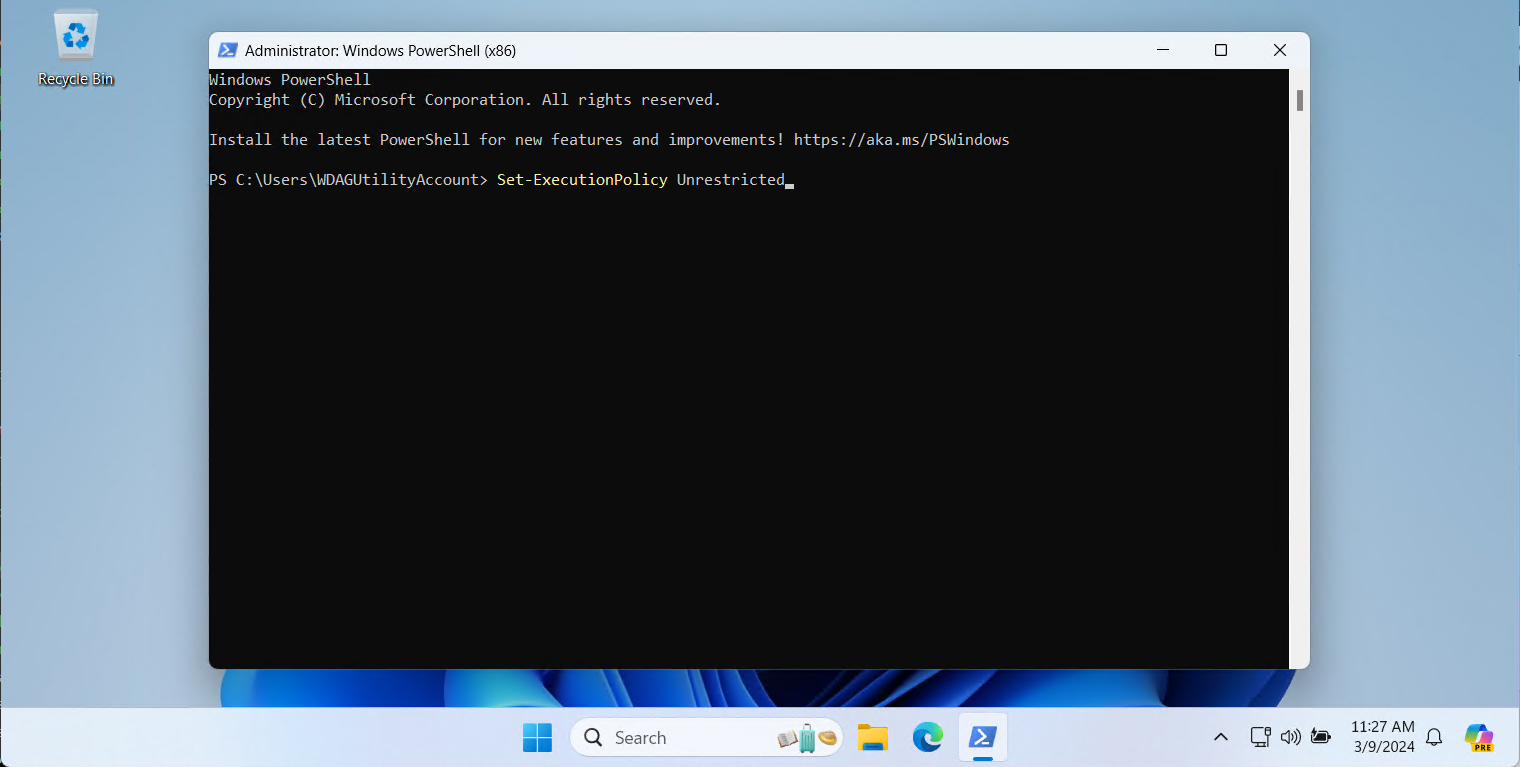
Run the following command in PowerShell to allow the script to run. Confirm the change with Y .
Set-ExecutionPolicy Unrestricted
Remove Windows bloatware
In File Explorer, navigate to the downloaded Zip Archive and extract it.
Then go to the extracted folder and run the Run.bat file.

Configure which bloatware to remove
After you have started Run.bat, you can choose between the options which bloatware should be removed.
We recommend option 1 .


Restart system
After the script runs, restart your computer to apply the changes.
Afterwards, your system will be free of unnecessary bloatware and your privacy will be much better protected.
Conclusion and personal view
This method offers an effective way to personalize and optimize Windows 11 and 10. By removing bloatware and adjusting system settings, it can improve performance and give users more control over their privacy.
However, it is important that users understand what the script does and be careful not to remove important system functions.
In short, it is a valuable tool for those who want to improve their Windows.
The ability to remove unwanted software and adjust system settings without having to delve deep into system configuration is a huge advantage.
Nevertheless, it should be used with caution and understanding of the changes made.